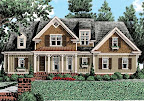
 I apologize for the quality of this picture, I will have better shots of the finished front in the next few weeks. Here you can see the front porch flagstones just after they were laid down. You can somewhat see the front door, which is mahogany with double glaze glass (again, good insulative properties), and a beautiful pewter detail between the two glazings.
Sunday, November 9, 2008
I apologize for the quality of this picture, I will have better shots of the finished front in the next few weeks. Here you can see the front porch flagstones just after they were laid down. You can somewhat see the front door, which is mahogany with double glaze glass (again, good insulative properties), and a beautiful pewter detail between the two glazings.
GBI and Insulation


 In the area of insulation we made another GBI-oriented choice. Just as we sealed the crawlspace, we chose to seal the attic via spray-in foam insulation. This seals the area as well as providing extremely high R-value insulation. For the walls we chose packed cellulose insulation. This brought the cost down versus doing spray-foam everywhere, but also has very high R-value insulation. In addition, it uses recycled materials (often newspapers) that are treated to repel insects and provide fire retardation. A mesh is hung from the walls and the treated cellulose shred is packed in behind the mesh. This type of insulation also has a very high sound-dampening affect, making the house nice and quiet inside. In order to seal the rest of the house, all gaps were sealed on the walls before the cellulose insulation was installed.
Siding and Stone Facade

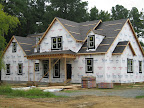
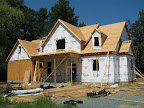
 This past month has been mostly siding, the last few bits of roofing, applying stone facade to foundation, porch, and chimney, and the rough electric/plumbing/HVAC. Here you see some pictures from a couple weeks ago where nearly all the siding has been put on. We chose Hardiplank siding for durability and ease of maintenance. The stone facade is actually brick that is fashioned to look like stone. The type we chose has the coloration throughout the brick so that it can be chipped to size like real stone. We also chose the optional "spotters", which are the larger, rounder stones. The spotters break up the rectangular ledgestone pattern just enough to give a natural flow to the overall look. These stone-like bricks are very durable and economical for foundation coverage.
Sunday, September 21, 2008
Windows Installed
 |
Tuesday, September 9, 2008
Rough framing is almost complete
 |  |
 |
Saturday, August 16, 2008
First Floor Framing

 The first photo shows the framing from the front of the house and the second photo is from the back. Notice that the first signs of a roof line are seen in the photo of the back of the house; that is the vaulted master bedroom.
Catching Up: First Floor Joists
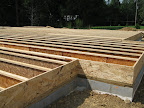
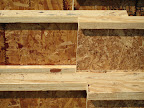 The first floor's joists are laid. Recent code changes require that the inspection be done before the subfloor is laid, giving us the opportunity to take these photos. This type of joisting is becoming more widely used due to its superior strength and durability. Since it uses less wood than traditional floor framing, it is a GBI choice for resource efficiency.
Catching Up: The Crawlspace Is Sealed
 Here you can see the crawlspace sealing that we discussed before. Notice that even the footings are wrapped. Around the outside perimeter a dense foam sheeting is laid and sealed with a foam "caulking".
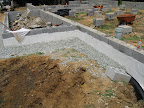
Catching Up: Gravel In The Crawlspace
 Pea gravel is laid down inside the crawlspace for additional drainage and to provide a level crawlspace floor.
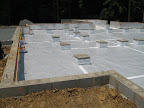
Catching Up: Foundation Waterproofing
 Here we see the foundation waterproofing underway. A waterproof layer is "painted" up to where the dirt will be backfilled. A drainage pipe is snaked along the foundation in a shallow trench where it will have drain outlets around the back or less visible side of the house. Over the drainage pipe is laid a layer of gravel, providing easy access to the pipe and more good drainage protection next to the foundation.
Sunday, July 20, 2008
Foundation and Sealed Crawlspace
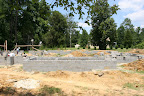 The foundation is almost complete! Now recall that we discussed doing a sealed crawlspace. We have decided to do this. The next steps in construction will be to waterproof the foundation and do the sealing work. After that, framing begins!
Footings Done and Blocks Delivered
 In the first photo you can see a good deal of the footings that have been poured and pointed. The second photo shows the blocks, rebar, mortar and sand that will be used to construct the foundation, which is the next step.
Water and Power

 Temporary water and power connections were setup to facilitate the construction. Using the well for water during construction means that we don't have to pay for water to be shipped to the site.
The Necessities
 Brad shows us the installed "facilities", next to which lies the permit posting. The front panel of the permit box gives an overview and inside one can find all the detailed paperwork.
Sunday, June 29, 2008
Catching Up: Digging the Footings
 The foundation is underway! In this picture you see a construction worker digging the first hole for the footings. My oldest son Adrian (5 years) loved the backhoe. He really wanted to drive it. It certainly did look like fun -- difficult, but fun!
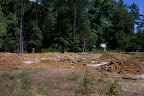
Catching Up: Staking The Foundation
 Now that we've got a well, the builder has the footings staked. When this is done, verified and ready, they can start digging the footings. This leads to the foundation; ours will be a crawlspace. Now we get to talk about one of our first Green choices. We are considering a sealed crawlspace. This allows us to keep moisture out of the crawlspace, but it does more than that. It creates another energy loss barrier and keeps the ducting under the house from losing energy as well.
Catching Up: The Well Is Completed
 Since I've just started this blog, it's time to catch up to where we are in the construction schedule. First thing to talk about is the digging of the well. The thing about wells is that despite mankind's amazing technologies, well-digging is still an art full of superstition and just plain luck. Since a well will be our source of water, we were naturally concerned about the flow rate we would end up with (remember what I mentioned about luck?).
Our well is dug and... (drum roll please)... we've got almost 40 gallons per minute! "OK", you say, "so what does that mean?". It means we will have plenty of water for ourselves and our vegetable and herb gardens. Hurray!
Jen's One (and a third) Green Acre
My husband and I have purchased a fine little 1.3 acre lot in Chapel Hill (lot 1 in Blackberry Hollow) and we are going to have a GBI (Green Building Initiative) and Energy Star certified home built there. I will be blogging about the construction progress, including the GBI choices, which ones we selected, and why. I will continually upload new photos of the construction to this blog's embedded slideshow (always available on the right-hand menu under my profile). I'll be talking a lot about building Green, but I'll also be talking about interior design choices, and anything else related to this home-building process that I hope will be of interest.
Subscribe to:
Posts (Atom)